Sunday, September 6, 2015

"I Love Sewing" Progressive Quilt

  
I had the great fortune and honor to win one of three progressive quilt tops that were created during Mid Atlantic MOD 2015 which was in April.  For those of you who are not familiar with this process, each member of the group brings one or more blocks to the weekend.  In advance, we receive fabrics and piecing guidelines for the theme.  During the weekend each one of us spends one hour designing the layout and piecing the top and/or making additional blocks for fillers.  At the end of the weekend the top is raffled off to one to one of the members in the group along with any leftover fabric for finishing.
48" x 60"

This what it looked like at the end of the MOD weekend.

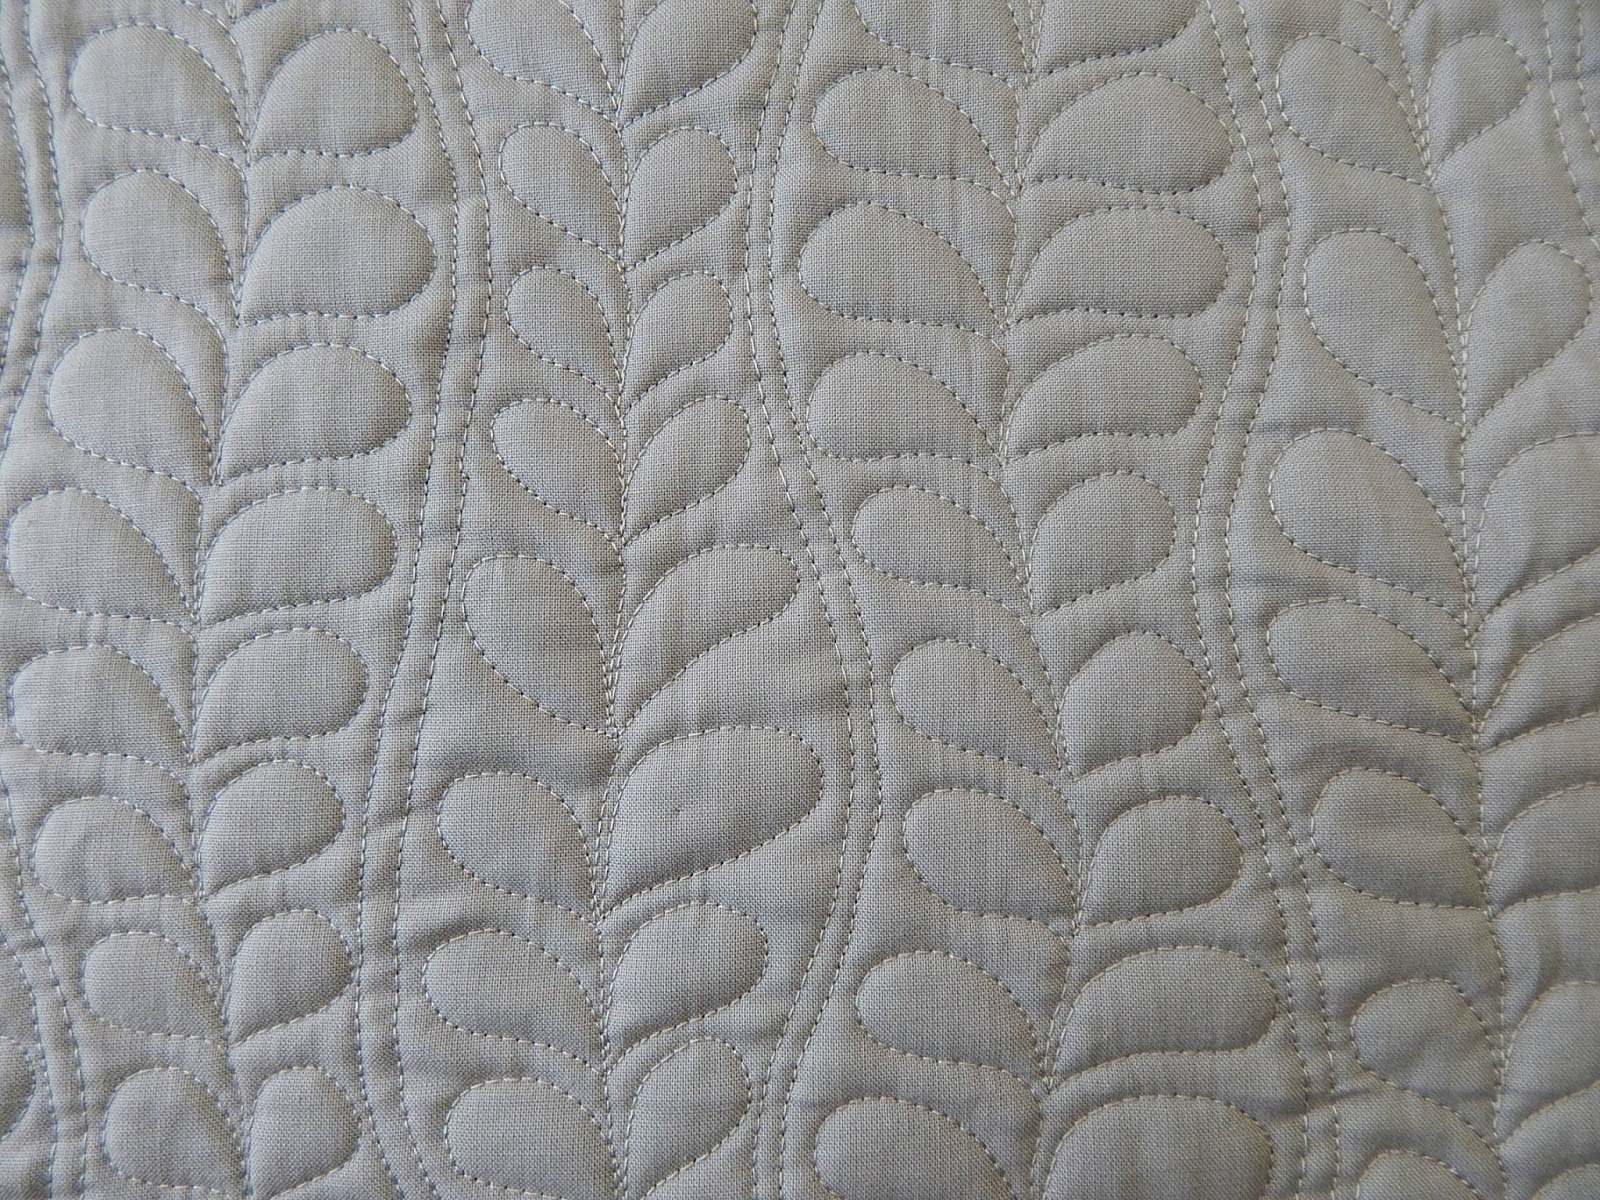
Since the top wasn't completely finished I made a few more changes before putting the rest of it together. For the quilting, I used a limited group of FMQ motifs and repeat them throughout using matching thread.  (If I didn't have thread-burying skillz before I certainly do now!)


I want to thank all the very talented members of the group including Robin, Beth, Michelle, Heather, Jessica, Sandy, Kim, Jill, Kathy and Tricia who made AMAZING blocks and contributed to the layout and piecing of the quilt top!

This will be submitted for consideration to enter the juried portion of QuiltCon 2016.... stay tuned!


Monday, July 13, 2015

"Crosses"

My latest finish is a wall quilt I call, "Crosses", and measures at 43" x 38".  It's my own improv design which began with a charm pack of Timeless Treasures solids I won at Mid Atlantic Mod 2014.


I started making a boat-load to wonky crosses during two group sewcials earlier in the year. The plan was to arrange them randomly into a larger quilt but when they got onto the the design wall to me it looked like a huge colorful very loud mess!  If you know me you know I like a more minimal approach, so to salvage my original failed idea I grouped them by color and then things started to come together.  I wanted this piece to be a truly organic process it did not disappoint. I would spend bursts of time standing in front of the design wall playing and then leaving and then playing and then leaving ...

These are some of the ones that didn't make the final cut.  They will make it into a few single cross pieces.


Quilting was done via walking foot using improv waves I practiced at a great workshop taught by Melanie Tuazon from Melinthattic in June.  I needed some curves to break up all those straight pieced lines.

Saturday, June 6, 2015

Mini Squares

I've always admired these types of quilts with the offset squares and lots of negative space to play with so I made one to decorate my office. The final measurements are 38" x 38".


I started out with a mini charm pack of Valori Wells Blueprint Basics.  Kona Pewter was used for the background.


For the FMQ I once again raided my Christina Cameli books for inspiration.  At the same time I wanted to mimic one of the print patterns in the squares.  


Books for inspiration combined with fabric design turned into this:


On of my friends commented that it reminds her of the popular Orla Kiely pattern seen often at Target!


Tuesday, May 26, 2015

Modern Monday - A Quilt

In 2014, I along with other members of my guild, participated in a monthly quilt-a-long using the Modern Monday blog posts created by blogger and author Jenifer Dick of 42quilts.  It consists of instructions for 52 6.5 inch blocks, mostly improvisational.  We were tasked with completing 4-5 blocks per month for one year.  It was interesting to see the differences in many of the member's blocks even though we all used the same instructions. 

Of course to those who know me it was no surprise that I used solds (Kona) with Bone as the background. 

I made about 47 blocks and 43 made it on this quilt, 65" x 76".


Two blocks (in an effort to, "Leave no block behind!") I made into wall hangings.  


But the last two blocks I truly didn't care for so they had to take one for the team.


FMQ on the blocks was done to make the solid's pop.  Large patches of solids were ditch stitched.  The background pattern I grabbed from one of my go-to resources authored by Christina Cameli. This is a great filler design. I've also used a star variation of it in another quilt.


I usually piece all backs on lap-sized quilts, But since it took me FOREVER to design a layout, by the time the top was together, I needed closure.  I chose Alexander Henry's, Gotas de Amor in Tea.  The purchase of this fabric marks the beginning of my love of skulls (in fabric that is).


Wednesday, April 22, 2015

Harry Potter - A Bed Quilt

When our guild first started a "freebie" table as a way to repurpose fabric, patterns, magazines and supplies to other members, I picked up this Harry Potter panel from 2001.

I have a relative who LOVES Harry Potter and knew she would appreciate something made from it.  

Since this was for her full-sized bed it wasn't that difficult to figure out a layout.  It may be hard to tell from the picture but all the stars are wonky.  After I finished with the stars, the wonderful staff at my LQS (Pennington Quilt Works) helped pick out the fabric for the outer border.  Then a talented longarmer friend and fellow quilt member quilted it with a combination of stars, swirls and circles to give movement complimenting Harry's wave of the wand!


It looks great in her room guarded by Hedwig!

Monday, March 23, 2015

Stethoscope Cover - A Tutorial


This design includes elements from various tutorials in addition what my daughter and I thought would look best for her stethoscope.  The finished width of the main piece allows it to just fit over a bell that is 2 inches in diameter.

Materials
1/4 yard 100% cotton or cotton blend fabric (WOF, not a fat quarter)
3/4 inch wide Velcro tape
7/16 inch snap fastener (I used Dritz)

Cut
5.75 inches wide by 27.5 inches long - 1 piece
1.50 inches wide by 3.25 inches long - 2 pieces (this is the tab) 
1/2 inch wide Velcro piece

Tab
Pin Velcro on right side of fabric 1/2 inch inch from the top and sides.  Sew close to the edge of the Velcro on all 4 sides.

With both tab pieces right sides together sew around 3 sides and trim top corners.

Turn right side out, press with iron and top stitch 1/8 inch around 3 sides leaving raw edge open.


Long Piece
Fold a short end up on the wrong side of the fabric 1/4 inch and press.  Fold another 1/4 inch up and press again.  Top stitch to secure in place.


With right side of base fabric facing up, place the second piece of Velcro 1 inch from the side and 3/4 inch up from the bottom on the left side of the fabric.  Sew close to the edge of the Velcro on all 4 sides.

With Velcro side of tab piece facing down pin tab on the right side of the base fabric 1/2 inch up from the base and baste in place.

Fold on long side with right sides together and sew, using a 1/4 inch seam, starting from the folded edge up 22.50 inches.  Back stitch to secure at top. Turn piece right side out.

Fold rest of long side raw edges 1/4 inch onto the wrong side and press.  Top stitch to hold in place.

Fold top part (this has the raw edges) right sides together and sew a 1/4 inch seam on the top.  Turn right side out.  Press down and then sew along the previous stitch line across the width.

Follow the snap directions to install snaps as shown below.

And your done!


Sunday, February 22, 2015

I Was at QuiltCon..... Sort Of

Although I didn't make it to this year's QuiltCon in Austin, TX this year my quilt, "Intersection", was chosen for display.
Here I am!


I started this quilt in August of 2014 while attending a "Slice and Insert" technique workshop led by Jacqui Gering, author of Quilting Modern.  Jacquie's book was the first one I purchased when I started modern quilting and is still one of my go to resources when looking for inspiration. It was amazing for me to spend time with her when she visited our quilt guild for a lecture, trunk show and class! 

Me with Jaquie Gering

Starting off with about seven of the blocks you see above, I embraced the total improvisation concept which allowed my to play as I didn't have to think about an "end game". There was no special final size in mind, no person or occasion it was intended for and no time frame.  (How often does that happen!)


When it came to quilting this type of piecing screams, "Echo!" to me and is what you see most commonly with this style.  I did try but could not come up with a substitute.  The only down side was all the thread breaks which gave me the unwanted title of, "Thread Burying Specialist".  Burying in groups instead of waiting unit the end eased the pain. For the border I knew I wanted to continue that theme for part of it and then collaborated with fellow guild member, Jess L., for the outermost portion which turned out to be pebbles.


Looking forward to displaying this on my new quilt ladder (Spoiler Alert! - subject for a future post) once it's returned.